Submitted by Brian on
In classical portraiture there are several things you need to control and think about to make a flattering portrait of your subjects, including: lighting ratio, lighting pattern, facial view, and angle of view. I suggest you get to know these basics inside out, and as with most things, then you can break the rules. But if you can nail this one thing you’ll be well on your way to great people photos. In this article we’re going to look at lighting pattern: what is it, why it’s important, and how to use it. Perhaps in another future article, if you enjoy this one, I’ll talk about the other aspects of good portraiture.
Lighting pattern I’d define as, how light and shadow play across the face to create different shapes. What shape is the shadow on the face, in simple terms. There are four common portrait lighting patterns, they are:
- Split lighting
- Loop lighting
- Rembrandt lighting
- Butterfly lighting
There are also Broad and Short lighting which are more of a style, and can be used with most of the patterns above. Let’s look at each of them individually.
1. Split Lighting
Split lighting is exactly as the name implies – it splits the face exactly into equal halves with one side being in the light, and the other in shadow. It is often used to create dramatic images for things such as a portrait of a musician or an artist. Split lighting tends to be a more masculine pattern and as such is usually more appropriate or applicable on men than it is for women. Keep in mind however, there are no hard and fast rules, so I suggest you use the information I provide here as a starting point or guideline. Until you learn this and can do it in your sleep, default to the guideline whenever you’re not sure.
To achieve split lighting simply put the light source 90 degrees to the left or right of the subject, and possibly even slightly behind their head. Where you place the light in relation to the subject will depend on the person’s face. Watch how the light falls on them and adjust accordingly. In true split lighting, the eye on the shadow side of the face does pick up light in the eye only. If by rotating their face a bit more light falls on their cheek, it’s possible their face just isn’t ideal for split lighting.
NOTE: any lighting pattern can be created on any facial view (frontal view showing both ears, or ¾ face, or even profile). Just keep in mind that your light source must follow the face to maintain the lighting pattern. If they turn their head the pattern will change. So you can use that to your advantage to easily adjust the patten just by them rotating their head a little.
What the heck is a “catchlight”?
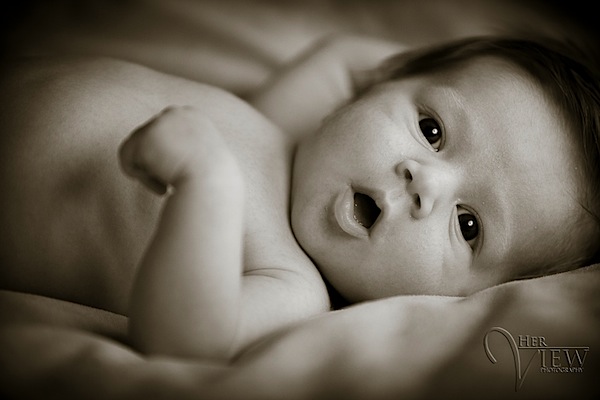
Notice in this photo above that the baby’s eyes have a reflection of the actual light source in them. It shows up as a little white spot, but if we look closer we can actually see the shape of the light I used in this portrait.
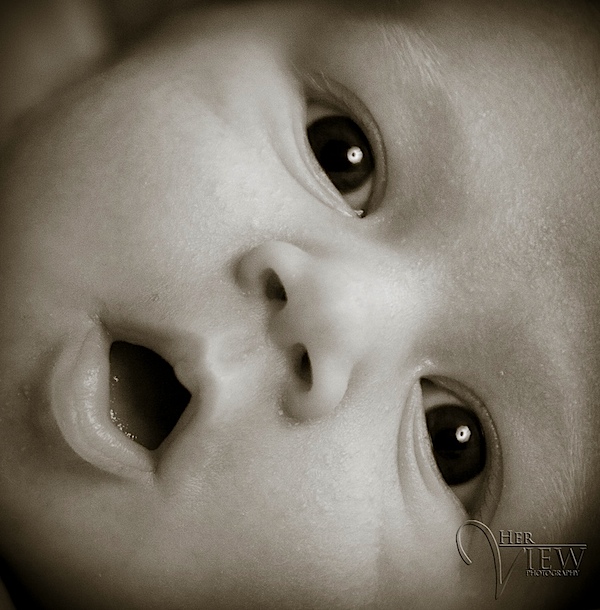
See how the bright spot is actually hexagon with a dark centre? That’s the light I used which was a small hexagon shaped soft box on my Canon speedlight.
This is what is known as the “catchlight”. Without the eye of the subject catching this light, the eyes will appear dark, dead and lifeless. You need to ensure that at least one eye has a catchlight to give the subject life. Notice it also lightens the iris and brightens the eye overall. This also adds to the feeling of life and gives them a sparkle.
2. Loop Lighting
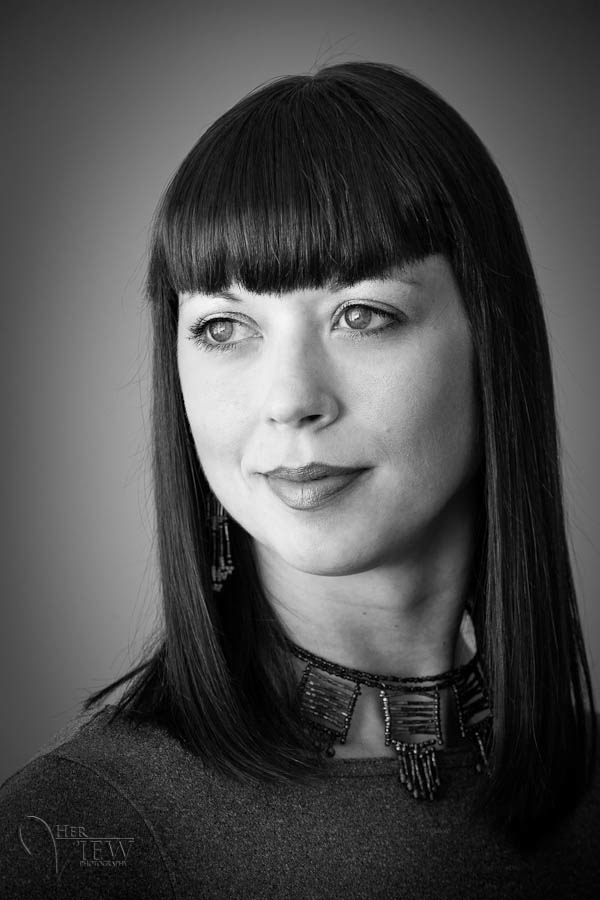
Loop lighting is made by creating a small shadow of the subjects noses on their cheeks. To create loop lighting, the light source must be slightly higher than eye level and about 30-45 degrees from the camera (depends on the person, you have to learn how to read people’s faces).

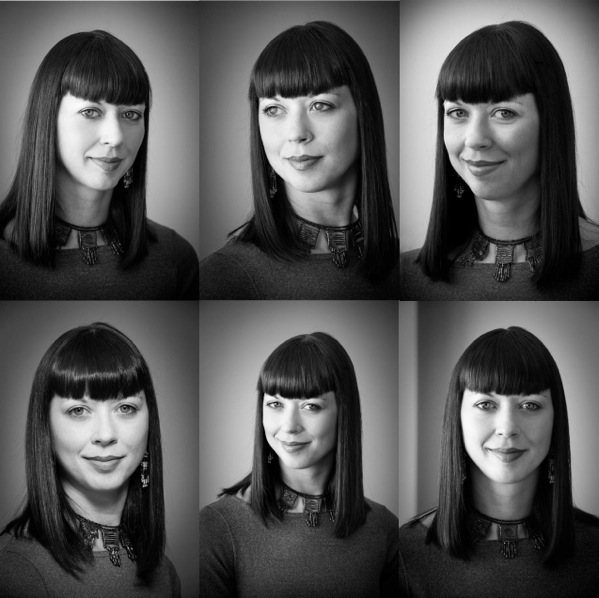
Look at this image to see where the shadows fall, and on their left sides you can see a small shadow of their noses. In loop lighting the shadow of the nose and that of the cheek do NOT touch. Keep the shadow small and slightly downward pointing, but be aware of having your light source too high which will create odd shadows and cause loss of the catchlights. Loop light is probably the most common or popular lighting pattern as it is easy to create and flatters most people.
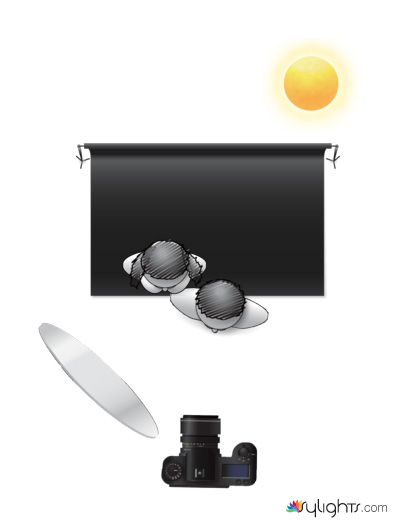
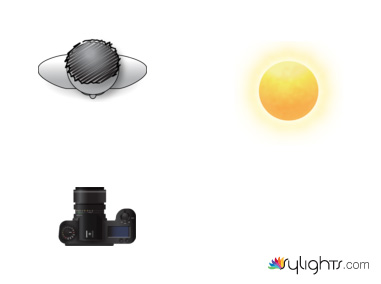
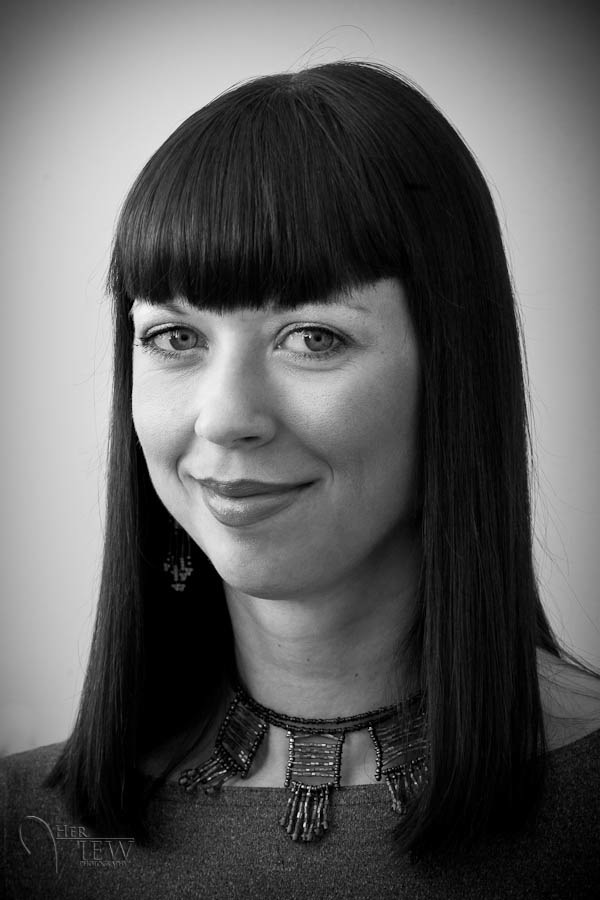
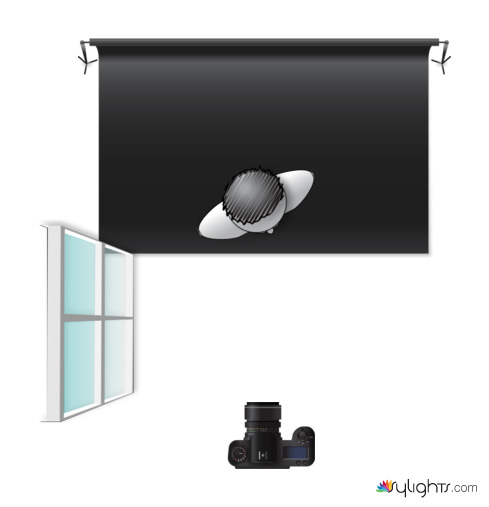
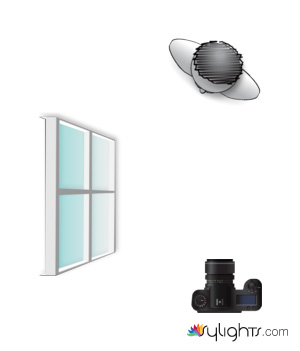
In this diagram the black backdrop represents the bank of trees behind them. The sun is coming over the trees but they are completely in the shade. A white reflector is used at camera left to bounce light back into the subjects’ faces. The reflector may or may not be in the sun but you can still pick up light even if it’s not. Just play with the angles, by changing the placement of the reflector you can change the lighting pattern. For Loop lighting it will need to be somewhere around 30-45 degrees from the camera. It also needs to be slightly above their eye level so the shadow or loop of their nose angles down towards the corner of the mouth. That is one mistake I often see beginners make with reflectors is to place them down low and angle it up. That lights up the bottom of your subject’s nose and does not create a flattering pattern.
3. Rembrandt Lighting
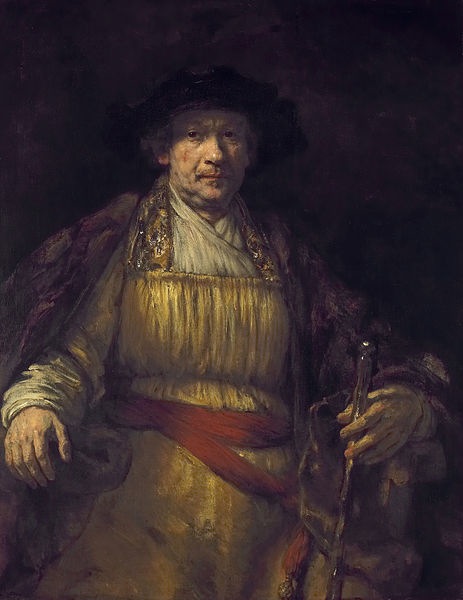
Rembrandt lighting is so named because the Rembrandt the painter often used this pattern of light in his paintings, as you can see in his self portrait here. Rembrandt lighting is identified by the triangle of light on the cheek. Unlike loop lighting where the shadow of the nose and cheek do not touch, in Rembrandt lighting they do meet which, creates that trapped little triangle of light in the middle. To create proper Rembrandt lighting make sure the eye on the shadow side of the face has light in it and has a catch light, otherwise the eye will be “dead” and not have a nice sparkle. Rembrandt lighting is more dramatic, so like split lighting it creates more mood and a darker feel to your image. Use it appropriately.
To create Rembrandt lighting the subject must turn slightly away from the light. The light must be above the top of their head so that the shadow from their nose falls down towards the cheek. Not every person’s face is ideal for creating Rembrandt lighting. If they have high or prominent cheek bones it will probably work. If they have a small nose or flat bridge of the nose, it may be difficult to achieve. Again, keep in mind you don’t have to make exactly this pattern or another, just so long as the person is flattered, and the mood you want is created – then the lighting is working. If you are using window light and the window goes down to the floor, you may have to block off the bottom portion with a gobo or card, to achieve this type of lighting.
4. Butterfly Lighting
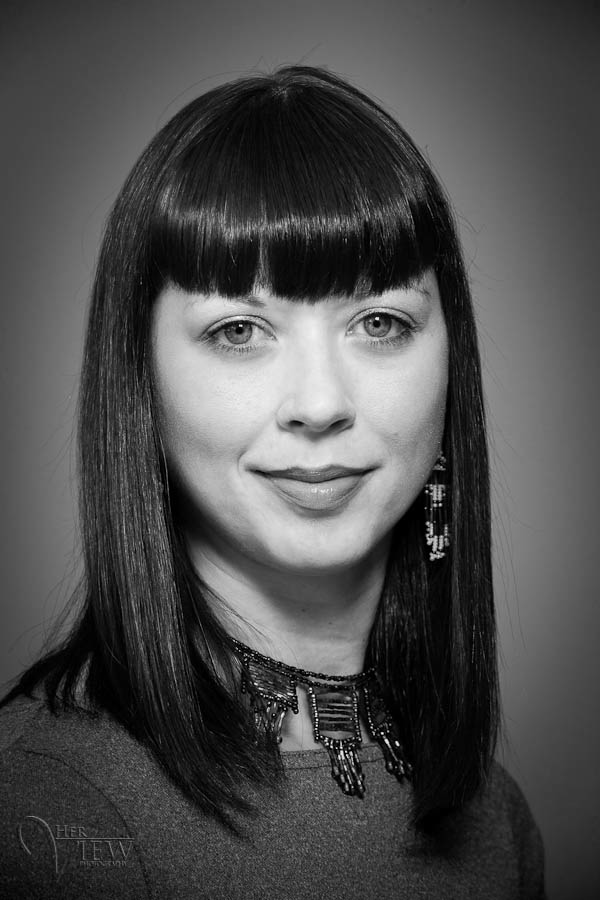
Butterfly lighting is aptly named for the butterfly shaped shadow that is created under the nose by placing the main light source above and directly behind the camera. The photographer is basically shooting underneath the light source for this pattern. It is most often used for glamour style shots and to create shadows under the cheeks and chin. It is also flattering for older subjects as it emphasizes wrinkles less than side lighting.
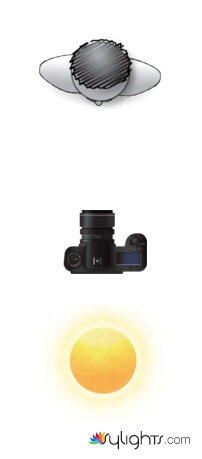
Butterfly lighting is created by having the light source directly behind the camera and slightly above eye or head level of the subject (depends on the person). It is sometimes supplemented by placing a reflector directly under their chin, with the subject themselves even holding it! This pattern flatters subjects with defined or prominent cheek bones and a slim face. Someone with a round, wide face would look better with loop or even split to slim their face. This pattern is tougher to create using windowlight or a reflector alone. Often a harder light source like the sun or a flash is needed to produce the more defined shadow under the nose.
5. Broad Lighting
Broad lighting is not so much a particular pattern, but a style of lighting. Any of the following patterns of light can be either broad or short: loop, Rembrandt, split.
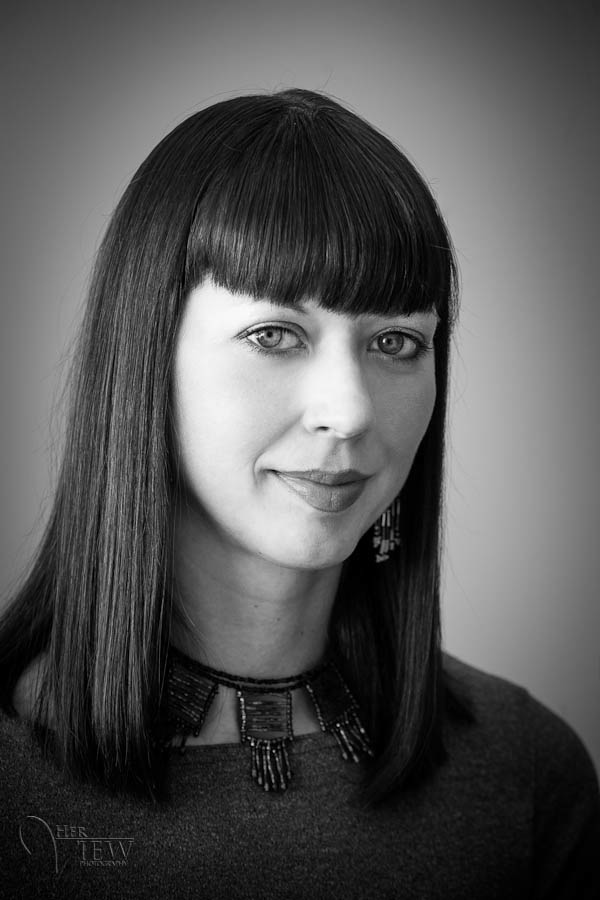
Broad lighting is when the subject’s face is slightly turned away from centre, and the side of the face which is toward the camera (is broader) is in the light. This produces a larger area of light on the face, and a shadow side which appears smaller. Broad lighting is sometimes used for “high key” portraits. This type of lighting makes a person’s face look broader or wider (hence the name) and can be used on someone with a very slim face to widen it. Most people however want to look slimmer, not wider so this type of lighting would not be appropriate for someone who is heavier or round faced.

To create broad lighting the face is turned away from the light source. Notice how the side of the face that is towards the camera has the most light on it and the shadows are falling on the far side of the face, furthest from the camera. Simply put broad lighting illuminates the largest part of the face showing.
6. Short Lighting
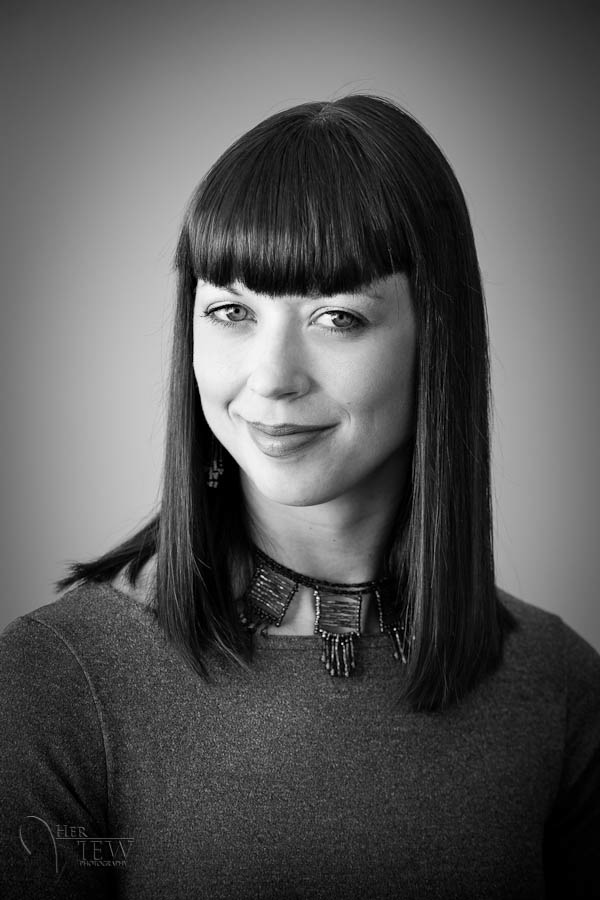
Short lighting is the opposite of broad lighting. As you can see by the example here, short lighting puts the side turned towards the camera (that which appears larger) in more shadow. It is often used for low key, or darker portraits. It puts more of the face in shadow, is more sculpting, add 3D qualities, and is slimming and flattering for most people.
In short lighting, the face is turned towards the light source this time. Notice how the part of the face that is turned away from the camera has the most light on it and the shadows are falling on the near side of the face, closet to the camera. Simply put short lighting has shadows on the largest part of the face showing.
Putting it all together
Once you learn how to recognize and create each of the different lighting patterns you can then start to learn how and when to apply them. By studying your subject’s face you will learn which lighting pattern will be best for them, and for the type of portrait and mood desired. Someone with a very round face that wants to appear slimmer in a grad portrait, will be lit very differently than someone that wants a promo shot for their band that makes them appear mean or angry. Once you know all the patterns, how to recognize and master quality of light, direction of light and ratio (we’ll discuss that in a future article) then you will be well equipped to handle the challenge.
Of course it is much easier to change the lighting pattern if you can move the light source. However if the main light source is the sun, or a window – it’s a bit tougher to do that. So what you will need to do instead of moving the light, is to have the subject rotate in respect to the light to change the direction it falls on them. Or change your camera position. Or change their position. So basically move the things you can move in relation to the light, if you cannot move the light source itself.
Practice Exercise
Corral yourself a subject (as in a real live person, not your dog) and practice creating each of the lighting patterns we just discussed including:
- butterfly lighting
- loop lighting
- Rembrandt lighting
- split lighting
Remember to show both broad lighting and short lighting – for each of the different patterns, where applicable. Don’t worry about any other aspect (ratio, fill light, etc) for now, just concentrate getting the patterns down pat first. Use light from a window, a floor lamp with a bare bulb (take the shade off) or the sun – but try and use a light source that you can see what’s happening (I’d suggest that you do not try using flash until you’ve got more experience, it’s harder to learn with because you can’t see it until after the photo is taken) This also works best to start out with the subject facing the camera directly, no turning except to create the broad and short.
Show us your results please and share any challenges or problems you encountered. I’ll try and help you solve them so you and others can learn from it, and get better for next time.
English
- Brian's blog
- Log in to post comments
- 简体中文